Overview
This article comprehensively covers how to set up GitHub Copilot in VSCode, enable it for Markdown files, and use Chat tools. A GitHub Copilot account is required as a prerequisite.
Getting Started with GitHub Copilot in VSCode
Installing the Extension
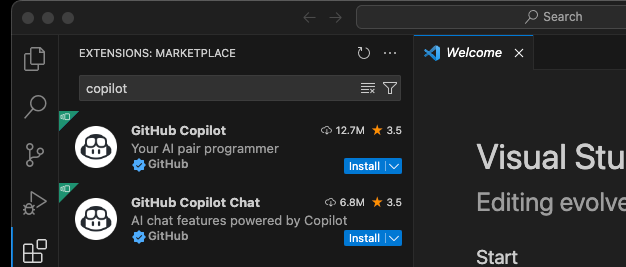
First, you need to install the extension in VSCode. Open VSCode, click on the icon with four squares in the left menu, enter “copilot” in the search text input, and click “install” to start the installation.
Linking with GitHub
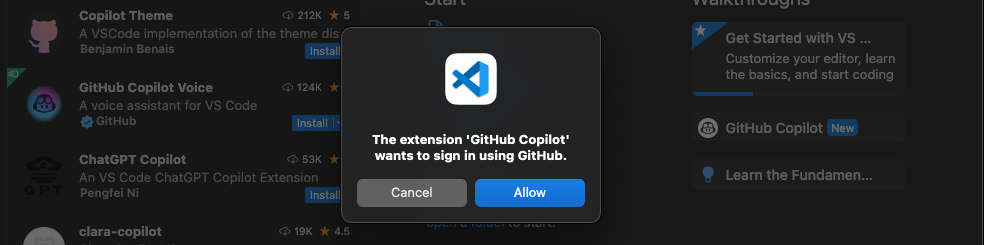
After clicking install and completing the installation, the following screen will appear. Click on “Sign in to GitHub.”

You will be asked to allow access to your GitHub account. Click “Allow” to grant permission.
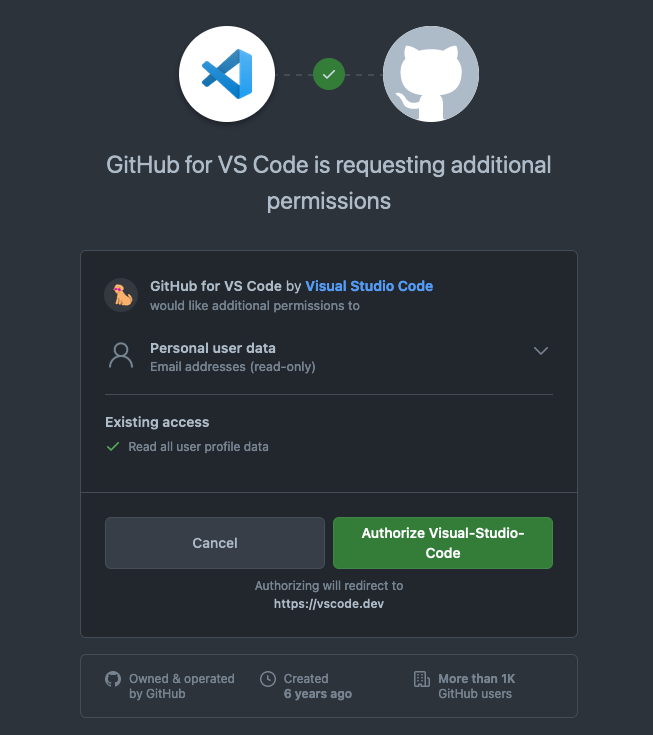
Click “Authorize Visual Studio Code” to give permission.
This completes the integration of GitHub Copilot with VSCode, and you’re now ready to use it.
How to Use
Basically, as you write code, suggestions will automatically appear. Use the following commands to write code efficiently with the suggested completions.
Cheat Sheet
| Function | Key |
|---|---|
| Accept suggestion | Tab |
| Reject suggestion | Esc |
| Open Copilot | Ctrl + Enter |
| Next suggestion | Alt/Option + ] |
| Previous suggestion | Alt/Option + [ |
| Trigger inline Copilot | Alt/Option + \ |
Enabling Completions for Markdown Files
By default, GitHub Copilot has completions disabled for Markdown files. If you write blogs or documentation in Markdown, enabling this feature is quite useful.
How to Enable
- Open the GitHub Copilot plugin page in VSCode
- Click the gear icon to open settings
- Change
markdownfromfalsetotrue
This enables Copilot completions in Markdown files. This blog was also written with GitHub Copilot assistance, significantly improving efficiency.
Using Chat Tools for Even More Power
GitHub Copilot Chat has a feature called “Chat tools” that lets you execute various tasks within the chat.
How to Use Chat Tools
Simply enter commands in the format #<command> <args>.
Common Chat Tool Commands
| Command | Function |
|---|---|
#codebase | Search the entire current workspace |
#selection | Add currently selected code in the editor as context |
#terminal_selection | Add currently selected terminal output as context. Useful for referencing error output. |
#fetch_webpage | Fetch content from a URL and add it as context |
For more useful commands, check the official documentation:
Summary
This article covered how to set up and use GitHub Copilot in VSCode.
- Basic Setup: Extension installation and GitHub integration
- Shortcuts: Tab/Esc to accept/reject suggestions
- Markdown Support: Change markdown setting to true
- Chat Tools: Add context with
#codebaseand#selection
GitHub Copilot not only provides code completions but also assists with writing text. Give it a try and see how it can help you.