Overview
This article explains how to update Visual Studio Code (VSCode) on Mac. In addition to manual GUI updates, it also covers command-line updates and auto-update settings.
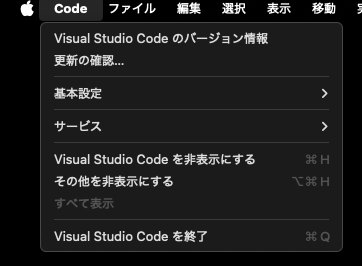
Updating via GUI
- Launch VSCode.
- Go to Code → “Check for Updates”.
When the update starts, you will see a screen like this:
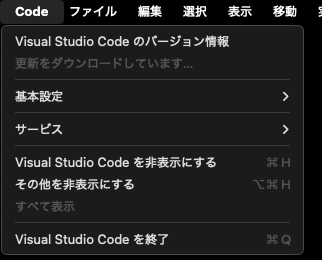
Once the download is complete, “Restart to Update” will be displayed.
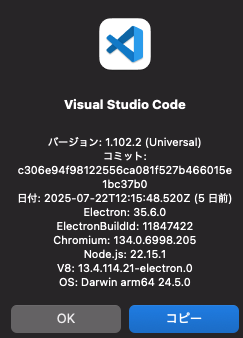
After restarting, click “About Visual Studio Code” to confirm that the version has been updated.
Updating via Command Line
If you installed VSCode via Homebrew, you can update it from the terminal.
Check the current version
| |
Update with Homebrew
| |
If VSCode was not installed via Homebrew, first remove the existing VSCode from your Applications folder, then install it via Homebrew. Your settings and extensions can be restored via account sync, so removing it is safe.
| |
After this, you can use brew upgrade --cask visual-studio-code for future updates.
Auto-Update Settings
VSCode has an update.mode setting that controls update behavior.
Open Settings (Cmd + ,) and search for update mode to change it.
| Value | Behavior |
|---|---|
default | Automatically downloads and installs updates in the background |
manual | Checks for updates but requires manual installation |
start | Only checks for updates when VSCode starts |
none | Completely disables automatic updates |
To configure directly in settings.json:
| |
Unless you have a specific reason, default is the recommended setting.
Troubleshooting
“Check for Updates” shows no updates available
Auto-update may be disabled. Check that update.mode is not set to none in your settings.
Update download fails
This may be caused by proxy or firewall settings. Check the following configuration:
| |
Extensions stop working after update
This may be due to extension compatibility issues. Try the following steps:
- Open the Command Palette (
Cmd + Shift + P) - Run “Extensions: Disable All Installed Extensions”
- Restart VSCode
- Re-enable extensions one by one to identify the problematic one
If the issue persists
Reinstalling VSCode may resolve the problem.
| |
If you sync your settings via a GitHub or Microsoft account, your configuration and installed extensions will be automatically restored after reinstallation.
Summary
This article covered how to update VSCode.
- GUI: Code → “Check for Updates” — a few clicks to complete
- Command line:
brew upgrade --cask visual-studio-codefor quick updates - Auto-update: Control behavior with the
update.modesetting
By updating regularly, you can take advantage of new features and security patches. After updating, always check the version information to confirm the update was successful.